 JPayne Woodworking Creative Craftsmanship
One of the most important things you can put into your shop is great lighting. Not only is it important if you are doing content creation but for safety. Having a dimly lit shop can be very dangerous. Using machinery and saws while not being able to properly see what you are doing can cause a whole host of problems.


As you can see from the pictures without the lighting the shop is very dark even during the day. So I reached out to a company named American Green Lights. While speaking with them I found out they offer a service that I did not expect. They will optimize the lighting layout for you. This was something I was very excited about. I do not know much about laying out the lighting of a shop and how to eliminate dark areas or even what power lighting I should have in what areas. To take advantage of this awesome service all that is needed is a sketch or drawing of your area layout. After taking the interior measurements of the shop I headed over to SketchUp.

In sketch up I did a simple layout of how the shop would work. The tools and benches in this mock up are not to scale they are just rough sizes to show the general layout of the shop. As you can see before talking to American Green Lights that I would have a ton of florescent lighting or led conversion lighting to get the coverage I wanted to get. I then sent this layout SketchUp over to the guys at America green lights. The go above and beyond and will use a SketchUp or drawing of the room or building you are trying to light and optimize the lighting to ensure the best coverage without buying way to many light or breaking the bank on unless bad lighting.
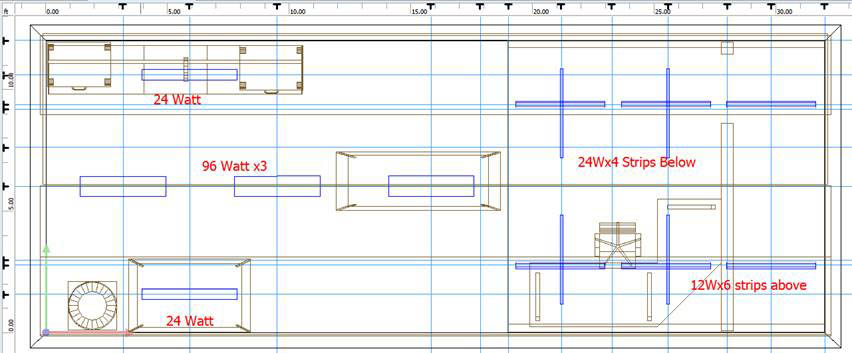
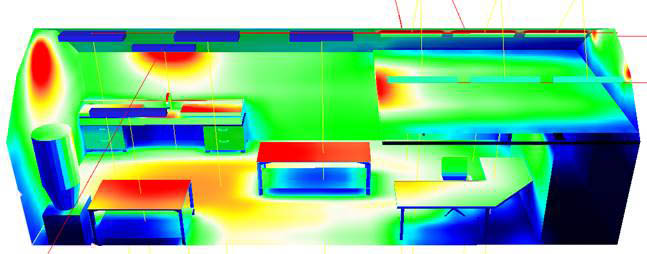
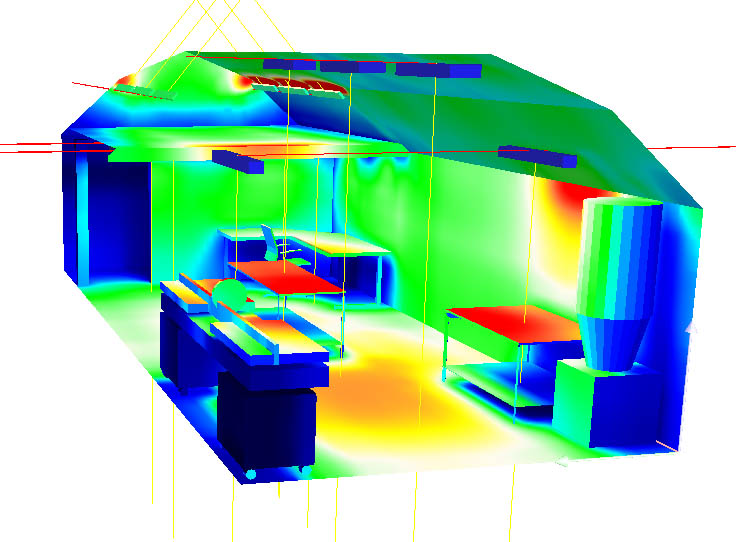
As you can see from this layout that the guys at American Green Lights came up with there are pretty much no dark spot within the building unless under one of the tools or cabinets. What really surprised me was who well the light coverage is with so few lights.

The layout of that the guys with American Green Lights cameup with called for 3×96 watt shoplights, 2×24 watt shop lights, 4×24 watt led strips, and 6×12 watt led strips. Also they optimized the color of the lights they were sending to ensure that the colors on film were going to be spot on. This is super important if you are looking to get in to creating content. Lighting can make or break a video. With the layout finalized it was time to get to work on installing the lights.


I started by cutting some pieces of osb board to use as a backing board for the 3 96 watt main shop lights. They will be mounted in the peak of the roof along the shop section. After mounting the main box of the light onto the board and drilling out a hole to route the wires into the box I then screwed the backing board to the rafters of the roof. I had already ran the wiring that would be used to power the lights. The light bar and reflector then screws into place using 3 small machine screws after wiring up the lights. I moved on a followed the exact same process to mount the other two 96 watt lights. Make sure to have all the breakers that will be connected to the light turned off and removed if possible.


With all 3 lights installed I went ahead and hooked them up to the breaker and tested them and was already getting excited about how it was looking. After testing the 2 96 watt lights at the peak of the building and with no issues I remove the breaker for the lights for safety and move on to mounting the two 24 watt shop lights on the side where the miter-saw station and also the cnc will be.


One of the great things about the design of these lights from American Green Lights is how eaisy they are to install and wire up. With the two 24 watt lights on the side I used the same technique to install them as with the lights in the peak of the building using a piece of osb to create a backing board for box of the light and mount it to the rafters studs. Wiring the lights is quite simple with the main wiring being an easy three wire design. A hot, ground, and neutral. These wires then tuck into the main box of the light and then the reflector with the leds is then attached with a single clip and screwed into place with the supplied screws.


The next task was to mount the four 24 watt light strips that will be mounted on the underside of the loft. These lights are different from the shop lights as they are a bit warmer of a color as well as they are strip lights designed to be mounted in areas were the lights can be recessed. This will be done once I finish the underside of the loft. Until then I will be mounting them directly to the joists of the loft. I marked out the positions of the lights on the joists using a ruler to ensure they were spaced evenly. To mount them into place there are pre-drilled holes on each end and are screwed into place. This was a race against time to get them installed before dark so actually had to do some of the work under the light of a flashlight.


The strip lights do not have a box that they are mounted to as they also use a detached ballast. These are wired the same as the previous lights but instead of a singular clip to power the lights there are 2 wires from each light that would be installed into the ballast. There are 4 small buttons that are pressed one at a time and the corresponding wire is inserted into the hole after the wire is slightly stripped. This makes installation super easy and after inserting all of the wires only some clean up remains. Once all of the lights are mounted and wired install your breaker and hook the wires up and you are good to go.


I can not emphasize how happy I am with these lights. They give off a brilliant true color that makes for some amazing looking video as well as I do not care for a dimly lit area. I love how having a well lit home or shop makes the area feel so much more inviting. While I will mainly be the only one in my shop I feel its important to enjoy the feeling of the area. Having a well lit shop also makes me feel so much more confident while working in the shop that I will be able to see everything that I am doing while working.
If you are working on a home, shop, business any building you can think of they guys over at American Green Lights can help you out and get your lighting optimized so that you are never in the dark. Head over to http://www.americangreenlights.com/ and check them out. I can say you will not be disappointed.
Make sure to sign up for the newsletter there is a lot of amazing things coming up soon like a modular assembly cart with built in table saw and router table, as well as miter-saw station, cabinet build and more. Also subscribe on YouTube and follow me on Instagram @jpaynewoodworking. Thank you for reading and I will see you on the next one.