 JPayne Woodworking Creative Craftsmanship
Storage, when you have plenty of it you never really think about the need of it. Once you are out of room for though it is the first thing on you mind. Having a way to properly store and organize not only in your shop but in your house, place of work, really anywhere makes life so much easier. This has been a constant problem for me since starting into woodworking. Starting in a shop that was only 8′ by 12′ there was almost no room for storage. Being in such a small space all available space was being used for tools and work benches. With the new shop there is some space that can be devoted to storage along with a few other ideas for saving space while adding storage. The first this was to get some kind of large storage up to assist in the moving of shops. The last thing to do was to place everything on the floor and have to work around the mess. Not only is this not an efficient way to work but this can also be very dangerous. If you would like to build this cabinet for yourself I do have plans up for sale and you can find them here. https://jpaynewoodworking.com/product/standing-cabinet/ go check them out and make sure to tag @jpaynewoodworking on istagram about your build I would love to see how you make them your own.

With all this in mind I took a few measurements at the shop and got to to work on SketchUp. I decided to design a somewhat large standing cabinet. I knew in my head a general style and size I wanted and how I wanted the cabinet to look in the end. I wanted a double door cabinet that would have plenty of storage space without taking up a massive amount of floor room. When you do not want to take up more space on the floor the best way to add storage space is to go vertical. After a few changes and redesigns I finally came up with a design I knew I would like.


With the design and cut list figured out I moved on to breaking down the sheet goods. For this build I decided to use up some of the large amount of MDF that I had at the shop. For those of you wondering why I used MDF. Some time ago I came across a deal locally where I purchased a large supply (around 20 sheets) of MDF some were 5/8” and some ¾ “ thicknesses. Now normally I wouldn’t purchase a large amount of this stuff but could not pass it up due to the price at witch I was able to get the material. There are always uses for sheet goods like this especially when you have a ton of large shop projects coming up. I started by cutting the sheets down using a Circular Saw and Saw Guide. I was using this method to do the initial breakdown. These sheets are heavy and hard to handle alone so using this method is the safest way to break down full size sheet goods into more manageable sizes.


One thing to keep in mind while braking down sheet goods like this is to be as accurate as you can be with the tools you have. While using a Saw Guide you need to compensate for the width of the base plate of your Circular Saw . This may be different from saw to saw. For me I mainly used the Dewalt 20v 7 ¼” Circular Saw with this saw there is exactly 5 inches from the side of the base plate to the cutting edge of the saw. This means that if I need to make a cut of 20 inches of length. I would need to place the Saw Guide at exactly 15 inches on the board I would like to cut to length. Make sure that you are placing the Saw Guide on the larger piece that will not be falling away after the cut. Having the Saw Guide on the wrong side can be dangerous as the piece you are pressing the saw against will be moving as the cut is made. Not only will this give you an inaccurate cut but this can also be very dangerous. If the piece falling away binds the saw between the material edges and the saw guide this can cause the saw to kick back. Once all the initial breakdown cuts have been made the sheets are more manageable and can be cut on the Table Saw.


Like with the circular saw you need to be as accurate as you can be with the cuts on the Table Saw. The good news is that this should be a good bit more accurate and easy with a good Table Saw. For me im using the Hitachi CJR10 10” job site table saw. This little table saw is a beast I have to admit I wasn’t to sure about the saw when I first got it and it has now changed my mind. Like any job site table saw there are limitations to the saw but those are normal. I was very impressed with how well it cut and how accurate it was right out of the box. Using the Table Saw made getting the correct dimensions on my cuts much easier and faster. While you can be very accurate with the Circular Saw it is a bit of a pain to go back and forth moving the Saw Guide and then to make multiple cuts it can be very difficult to get the exact same cut across all panels. A good Table Saw will allow you got get matching cuts every time. This will be especially important when cutting the dado cuts


Once all of the boards had been cut to size it was time to move on to the rabbet and dado cuts. If you do not know the difference in the two cuts it is pretty simple. They are essentially the same cuts with the rabbet cuts being made on the edge of a board with one side open and the dado through the material to enclose the cut on three sides.

To do this with the table saw you can take a couple of different methods. One is to align your fence to allow you to cut the outer most cut of the rabbet or dado using the standard blade. Then move the fence to cut the opposite sides outer edge then moving the fence a small amount at a time make multiple cuts between the two outer cuts to give you the correct size dado or rabbet. This way is fine to do it is just a good bit more work and in my opinion anytime you have more than one cut to make there is a greater likelihood of not have the correct dimensions.


For me it was not much of a choice to use a Dado Blade Set this would allow me to set up the thicknesses of the cuts I would need to make then make one cut for each rabbet or dado cut. This also makes getting the proper alignment of the dado cut for the shelves much easier. By cutting one dado then the adjacent dado on the opposite sidewall without moving the fence of the table saw it ensures that the dado would be at the same distance and dimensions from the ends of both sidewalls. While doing these cuts it was very very important to properly support the material that would be hanging from the end of the saw. I did this by using outfeed rollers with a long piece of spare material on them. I then aligned and leveled the top of the spare material to the top of the table saw. This would keep the material on the saw supported and level making it much easier to move on the saw. If you do not have this have someone help you. It can be very dangerous without the extra support for the material. Also use a tape measure to directly measure all cuts for the dado cuts. This will make sure you have the correct spacing between the dados and proper fit of the shelves.


At this point all of the dado and rabbet cuts have been made. I chose to paint the sidewalls and doors of the cabinet. This mainly was because I was going to be doing an epoxy pour onto those panels. The battleship gray color would give a cool looking base to start off with. I placed the panels down onto stickers on the floor and used a roller to paint on the color. While doing this make long strokes with the roller this will help give you a smoother finish. Once the paint is dry. After painting all of the interior sides of the panels I let them completely dry before flipping them over and repeating the process on the outer side where the epoxy will be poured. I then let the panels fully dry before moving onto the epoxy pour.


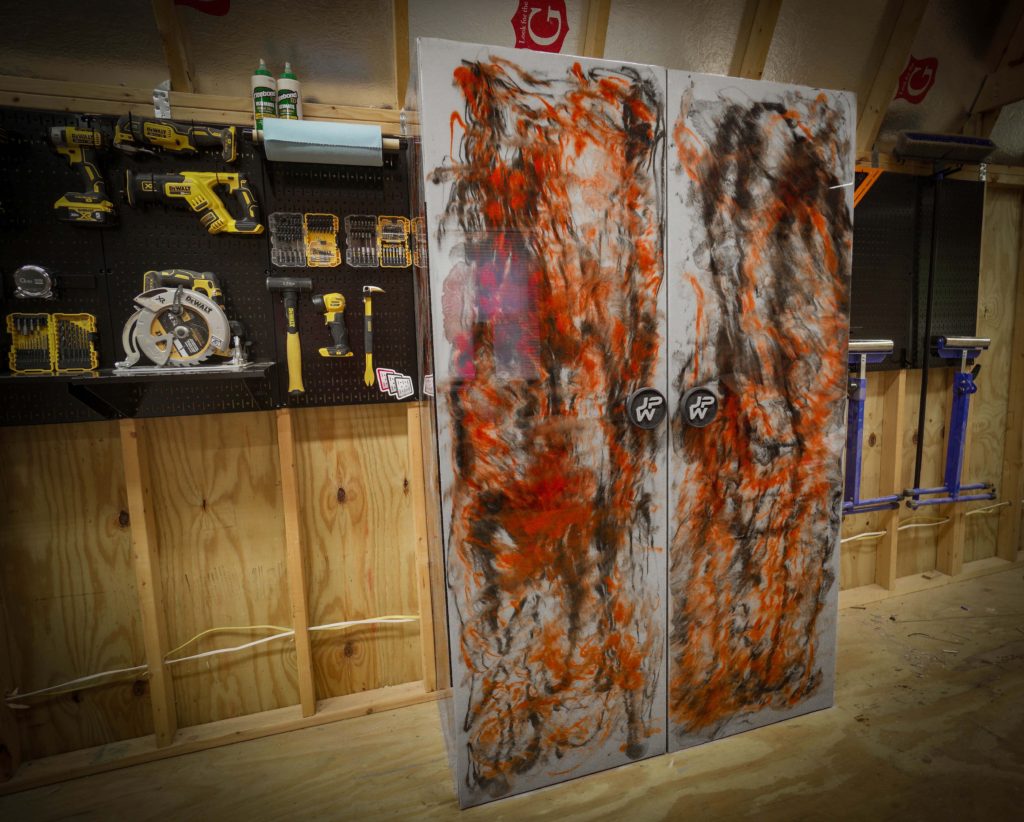
Mixing up this batch of epoxy I used a paint mixer this made mixing the larger amounts of epoxy like this easier and faster. These were large panels and would need a good bit of epoxy to completely cover them. Using some Total Boat Table Top Epoxy and pigments from kppigments.com I wanted to have an interesting pattern in the epoxy. I wanted almost a red and black smoke effect to the pattern.


Once the epoxy was completely mixed I separated off enough to add the colors into for the desired pattern and added the color and mixed in the pigments well. To do this pour it is a very different technique. First you want to flood the panel with clear epoxy. While you do want to have it flow all the way over the edges you do not want to do this straight away. Instead pour enough to completely cover the panel onto the center of the panel. Using a Paint Spreader lightly push the top layer of the epoxy toward to edges of the panel stopping just before the edge. Let the epoxy slightly level out and then start to spread the epoxy more until it rolls over the edge of the material. You want to do this so there is a smooth even flow over the edge of the panel or you will end up with what looks like large drip on the edge of the panel. You man also add the color at this point and have it flow over the edges of the panel. This is how some boards with this style pour achieve a stone or granite type look.


P 33,35,34
For this design I did not have the colors flowing over the edge as it was not necessary for the look I was going for. Using a fresh paint brush to dab the colors around and then working the colors around with a heat gun gave this a wispy almost wind blown look. All of this is completely cosmetic. I wanted to do something different and I have not seen an epoxy cabinet. Doing something different and cool can sometimes make a project just more personal and a lot more fun. I let the epoxy completely cure before moving on to assembly.


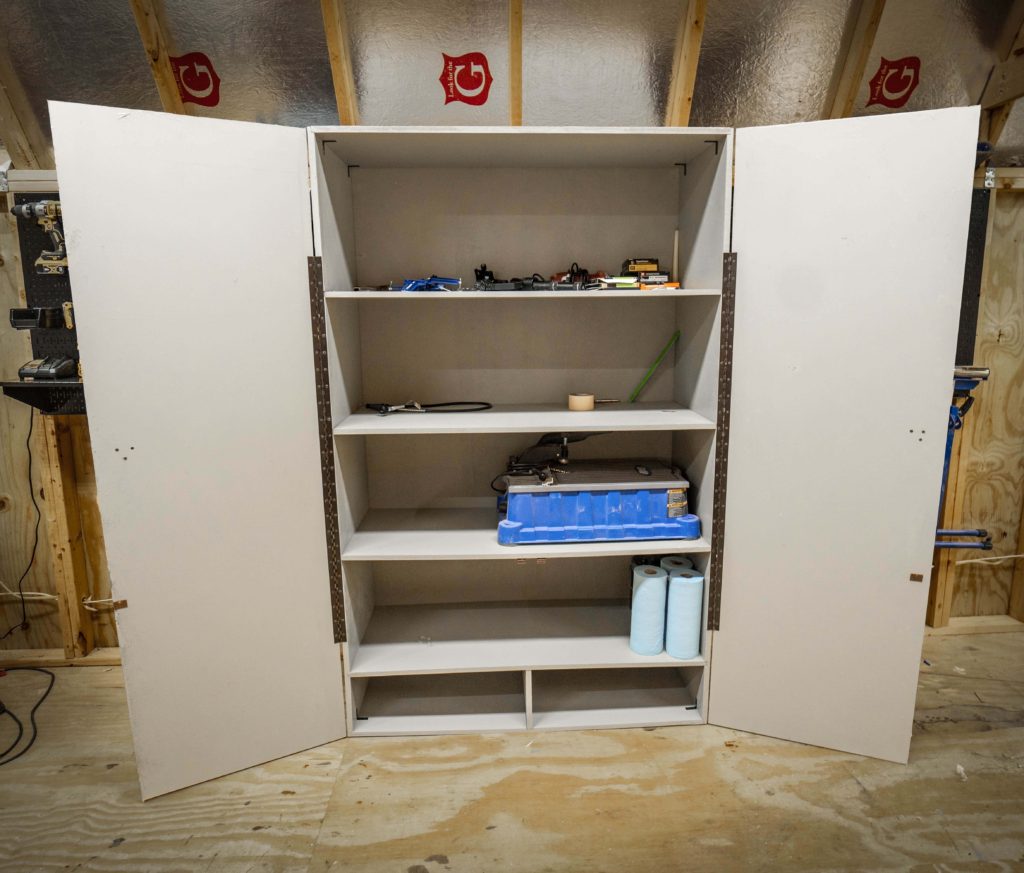
Once the epoxy was cured it was time to start assembling the cabinet. I started by placing the back panel of the cabinet onto spacers to lift it off of the floor of the shop and placing the sidewalls into place. Then placing the top into place. Using a Speed Square and Corner Clamps to ensure the panels were perpendicular to each other I used L-brackets to hold the panels in place. Not only would this hold the shell of the cabinet together but it will add strength to the outer corners of the finished cabinet. I then repeated this process on the bottom panel of the cabinet.


With the shell of the cabinet together I moved on to install all of the shelves. This is where being accurate with all of your cuts really pays off as the shelves just fell into place perfectly. There is nothing quite like the feeling of reassurance that you made all of the cuts properly as the pieces fall together. Once all of the shelves were in place I countersunk screws into the sides of the cabinet to secure all of the shelves and the back to the walls of the cabinet. During this part I had to be careful not to drill the countersink hole at a angle. This would cause the screws to come through the shelves or the back and be exposed. After installing all of the screws I also installed the feet to the base of the cabinet and then stood the cabinet up getting the first full sense of the size. At this point it was full steam ahead I was ready to see this beast completed.


Next was the doors. For the doors I was going to be using a 48” piano hinge this would have plenty of strength to the hinge section of the door and support the weight of the door and any future add-on I might do like small shelving and things like that. I started by measure and marking the appropriate distance from the top and bottom of the door to perfectly center the hinge on the interior of the door. Using a self centering drill bit to drill pilot holes for the mounting of the hinge and using the impact driver to mount the hinge with the supplied screws. With the doors installed I then installed the magnetic door catches to hold the door closed.


As if having a crazy custom epoxy outer shell wasn’t custom enough I decided I want to take it one step further. I wanted to make custom large door pulls. To do this I jumped onto v-carve and worked out a design for a large circular door pull with my logo in the center. I also designed two more smaller circles that would be the spacers between the face of the door and the pulls.


Once the design was finalized it was time to jump on the i2r8 UCCNC from i2rcnc.com and knock out this cut. I was going to be cutting the pulls with a 1/8 end mill down-cut bit from bitsbits.com these bits have there awesome astra coating this makes the bits blow through the material with much less resistance as well as gives the bits a much longer cutting life.


Once UCCNC is open and the cut file loaded it was time to zero out the machine and start the cut. One of the things I am really starting to like is the UCCNC program. This is one powerful program. You can literally control any aspect of your machine as it is running as well as being able to look at the display of the toolpath as it runs makes spotting problems if there is any much easier. This program comes with the i2rUCCNC machines and it is well worth having. The more in depth I get into the program the more and more I like it. If you are into cnc machining or cnc woodworking def head over to i2rcnc.com and check them out.


The cuts on the door pulls came out awesome. I sanded down the pulls just to make them a bit smoother and prepped them for paint. Also I added a couple of countersunk holes into the spaces to allow me to attach them to the outer part of the door pull. Once I had them ready to assemble I used some black spray paint to give them some color to match the cabinet.


While the paint was drying I took that time to mark the mounting points on the door where I was going to be mounting the door pulls. Marking first the distance from the top of the door then the distance inward on the door I wanted to mount them. Once these points had been marked I then drill pilot holes to allow for the mounting of the pulls. After assembling the pulls I then mounted them to the doors using short screws.


I love how this cabinet came out. It honestly exceeded my expectations. It is such a satisfying feeling to have a vision in your head of a project and work so hard to get the project completed and it come out even better than expected. It is a feeling I hope you experience. Making things and creating is much more than just woodworking, metal working, or whatever you form of creation is. It is an art in its own right and you should let yourself take risks and try new things. That is were the most amazing ideas come from. From the unknown and then finding some spark of an idea. Then forming that idea into a plan and seeing the plan through. So do not be afraid to try then fail then try again and again. I hope you enjoyed this article and seeing this crazy process.
If you would like to build this cabinet I do have detailed plans available. With material list, 3d parts list, and step by step directions. You can find the plans here: https://jpaynewoodworking.com/product/standing-cabinet/
Make sure to subscribe on YouTube HERE. Also follow me on Instagram @jpaynewoodworking for more photos and videos. As well as sign up for the newsletter to receive notifications on new projects, plans, products and news.
Thanks again and I will see you on the next one.
