JPayne Woodworking Creative Craftsmanship
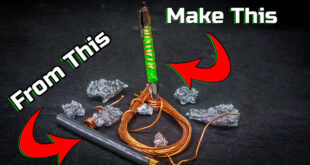
Duck calls are one of the lathe projects that are extremely gratifying to make as well as them making great gifts for anyone you know who enjoys duck hunting. They are are also much simpler to make than you would believe and can be made as a very personal gift for any of your friends and loved ones. So I am going to show you the process in making a hybrid epoxy/wood duck call. Below you will find a list of materials and tools you will need.
Tools – Wood Lathe, Lathe Tools, 5/8 inch drill bit, 5/8 inch expanding arbor mandrel, Ca Glue and Activator, vacuum chamber, pressure tank, 3 wheel buffing kit, Micro mesh sanding pads, Hot Glue Gun, 4 jaw lathe chuck, drill chuck
Materials – wood of your choice, Cactus Juice stabilization resin, Lexan, Epoxy Resin, Duck call Insert, Duck call band
Stabilize the Wood

To start off you need to stabilize the wood you will be working with. This is done for multiple reasons. The first reason is that stabilization will help with moisture not being as much of an issue with the wood. The stabilization process removes the air from the wood pieces and replaces it with a heat activated resin. This makes the wood much less susceptible to damage due to moisture. This is very important in a duck call as they are used in a damp environment as well as while being blown into your breath has moisture. The second reason is due to the air being removed from the wood it greatly decreases the chance of air being drawn out from the wood during the epoxy curing process and causing bubbles.This is done by placing the wood into the resin inside a vacuum chamber. In this process in the video I used a wood hardener from minwax and while it did work I would advise using a proper stabilization resin. I suggest Cactus Juice it is a very effective stabilization resin. To stabilize the wood place the wood into the Cactus Juice make sure that the wood is completely submerged into the resin. Placing a weight on the wood might be necessary to keep the wood submerged during air removal process. This is best done entirely in the vacuum chamber. Once the wood is submerged place the lid onto the vacuum chamber and turn on the vacuum pump. Bubbles will start to rise out of the resin as the air is pulled from the wood. Allow the vacuum pump to run until there are no more bubbles coming from the wood. This could take several hours. If using Cactus Juice you will then turn off the vacuum pump and release the vacuum pressure and allow the wood to sit in the resin for a minimum of double the time it took to remove the air (example 2 hours to remove the air = 4 hours soaking). Now you will need to bake the wood at 200 degrees for 2.5 to 3 hours to harden the resin.
Make the Epoxy Mold


While I usually make my call blanks using a cylindrical mold. I decided to make this one from Lexan. The dimension of the mold are 4.5 inches long by 2 inches wide and 2 inches tall. To make the mold cut all of your parts to dimension. Sides are cut to 4.5 inches long by 2 inches wide and the ends are cut to 2 inches by 2 inches. Once all of the pieces are cut you can also use a larger piece of Lexan or plastic corrugated board as the base. Using a hot gule gun place the mold onto the base and all of the pieces together. Make sure that all of the seams are sealed. Make multiple passes and layers to ensure that will be no leaks from the epoxy.
Pour Epoxy


Once the mold is complete lay the stabilized wood into the mold. You might have to take steps such as gluing the pieces together with ca glue in smalls spot on the very ends as well as at the base this will stop the wood floating up after the epoxy is poured. Mix up your epoxy. With this particular project I used around 10 ounces of epoxy total. Once mixed slowly pour the epoxy into the mold do not rush as this will help to push air out of the mold that would like wise get trapped. Once the epoxy is poured place the mold into the pressure tank and allow the epoxy to fully cure before removing it.
Rough Shape the Blank

When the epoxy is fully cured remove the mold from the pressure tank and remove the mold. This should be simply removing the hot glue and then popping off the lexan sides. The epoxy should not adhere to well to the lexan and should be easy to remove. Once the blank is out of the mold mark the center using the corner to corner method and mount it on the lathe to turn the blank to a consistent cylinder. The cylinder should be turned just small enough to mount within the 4 jaw chuck on the lathe. With the blank turned to he correct size mount the blank centered into the 4 jaw chuck. Make sure the blank rotates smoothly on center without wobbling.
Drill 5/8 Inch Hole

With the circular blank secured into the 4 jaw chuck use the drill chuck with the 5/8 inch drill bit to drill a hole through the length of the blank. This should be done slowly with the lathe set to a medium speed. Also do not back the bit out of the blank while the lathe is on and turning. If the blank were to bind for any reason it could pull the bit from the drill chuck or the blank from the 4 jaw chuck. Both could be dangerous. When you back the bit out turn the lathe off and rotate the lathe by hand. Also be careful to not to forcefully break through the side of the blank nearest the 4 jaw chuck. The bit could hit the 4 jaw chuck and damage the bit. Once you have the hole bored completely through the length of the blank remove the blank from the 4 jaw chuck.
Rough Shape the Call and Cut Band Tenon


Now that the hole is drilled in the call mount the call onto the 5/8 inch expanding arbor mandrel. As you tighten the screw on the mandrel to expand the arbor make sure not to over tighten the screw as this could cause the call to split. It only needs to be tight enough to stop the call from spinning while you cut the call with the lathe tool. Also make sure to install the mandrel into the head of the lathe before mounting call. Once the call is mounted onto the mandrel rough shape the call slightly larger than the final size you would like the call to be. Next you will need to cut the tenon that the call band will be a fixed to. Do not cut to much material at a time and test fit the band until it fits snugly. With the diameter of tenon cut to size mark the width of the band on the call and cut the tenon back to the width where the band fits flush with the end of the call. Just like cutting the tenon to size remove only small amounts of material at a time and test fit the band often.
Cut the Call to Its Final Shape


Calls can be many different shapes I decided to a longer shape with a bulb in the middle. You can cut the shape to any one you would like or you know will be the most effective. Do not rush the cutting as if you cut to much from the call it can become to thin near the hole drilled in the center. This could cause the structure of the call to be weak. Also keep in mind the end of the call that will blown into will need to have a smooth shape to it and is best to have a bit of a shoulder. Once the call is cut to its final shape sand the call starting with 80 grit up to at least 1500 grit before moving on to finishing.
Apply Finish


You can finish the call in a multitude of ways. I chose to go with a ca glue finish the ca finish is a high gloss finish that is also water resistant. Start by applying a bead of ca glue to the call and using a shop cloth spread the ca glue evenly while rotating the call on the lathe by hand. DO NOT TURN THE LATHE ON! This would throw the glue and also ruin the finish. With the ca evenly spread use activator to instantly set the glue. Repeat this process at least 3 time and this will give a deep high gloss finish once sanded.
Final Sanding


For final sanding start at 1500 grit and work your way up to 12000 grit micro mesh. Once at 3000 grit and above start the wet sanding process. Make sure to use plenty of water but not to flood the paper. This will help remove grit from the paper and reduce the amount of scratches. Also take you time and sand in a circular motion with the lathe off. This will give the best finish and highest gloss once buffed.
Install Call Band


I you are installing a band that is not pre-finished this step can be done before final finishing and sanding. If using pre- finished bands do not install the band before finish the call as it will scratch the band during sanding. Install the call band onto the tenon using ca glue. Make sure to scuff the inside of the band with a lower grit sand paper this will allow for more adhesion to the glue. Apply a small bead of glue to the tenon and slid the band on to the tenon being careful not to spread glue onto the calls finished surface. Allow for the glue holding the band to fully set before buffing.
Buff and Shine

I like to use a 3 wheel buffing system when I use a ca glue finish. Buffing the ca glue finish can give a beautiful gloss shine. Start with the course wheel and compound and move progressively to the final wheel and compound. When buffing do not get in a rush and do not let the call sit in one spot on an of the wheels it can and will burn the finish. Also keep the lathe set to a medium to lower speed. Constantly rotate the call and move the call in a back and forth fashion. Also if you are using a pre-finished band be careful to not remove the finish on with the buffing wheel. It is not a bad idea to tape the band off with masking tape before you go to the buffing wheels. Once you have finished at the final wheel use a cloth or lint free rag and wipe all of the buffing compound residue from the call.
All Finished Up Go Talk to Some Ducks!


Now just install the duck call insert into the end with the band and the call is all finished up and ready to go call in some quackers. These calls are a lot of fun to make and look as great as they sound. This particular call with the dark blue/purple looks simply amazing in my opinion. What do you think? How do you like the color? Let me know in the comments and if you have any questions leave them in the comment section as well.
Make sure to so subscribe on YouTube Here.
Follow me on Instagram for daily videos and pictures HERE.
To show your support or to order one of these calls you can head over to my ETSY or show your support on Pateron.
Thank you guys for watching and I will see you on the next one.