JPayne Woodworking Creative Craftsmanship
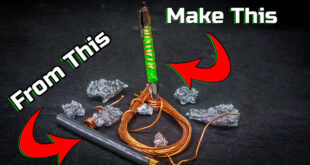
As an avid pool player I have wanted to make to build a pool cue for some time now. With my experience using epoxy it was inevitable that it would be a an epoxy hybrid cue. This is going to be a custom butt section for the cue. Modern cues simply have to much technology and research at an affordable price to make it a viable decision not to use a manufactured shaft. I went with an OB +1 shaft with that accepts a 3/8 by 10 thread joint pin. This was a blast to build and had a few different obstacles that made working on a wood lathe a bit of a challenge.Some of the materials I used can be interchanged such as wood species and epoxy color. Also before building you own cue be sure to plan out the build. There are many different types of cue hardware and if you are using a shaft that is pre-manufactured make sure to check with the manufacturer to ensure you get the correct hardware. Joint pins come in a few different sizes, shapes, threads and designs. Also some higher end shafts might use proprietary joint systems. This could make it necessary to order the joint hardware directly from the shaft manufacturer. Below I will link the materials and tools I used. Leave a comment with any questions or to let me know what you guys think of the cue.
Material , Hardware, Tools:
Black Walnut,Total Boat Epoxy , Kp Pigment (Shakira Red Pigment) ,3/4 inch Plywood (for mold) ,Poplar Wood Dowel ,Packing Tape, 4 Jaw Chuck , Stick Fast CA Glue , Drill Chuck
Sandpaper 80- 1500 grit , Wood Lathe Steady Rest
Micro Mesh Pads, Spur drive , Turners Polish , Live Center , Jet Wood Lathe, Lathe Chisel , 3/8 by 10 Thread Tap, .34 oz HEADLESS WEIGHT BOLTS , 8mm 1.5 Thread Tap , TOP PLUG BUMPER ,Various Drill Bits, 3/8 by 10 Thread Joint Pin, BLACK LINEN JOINTCAP , BLACK LINEN BUTTCAP
Splitting the Walnut

The walnut I was using was originally intended to be used as firewood and was stored where it was not on the ground so moisture was not a problem. Splitting the wood into small slivers was needed to be able to fit the wood into the custom built mold. The mold was build using a friends Cnc so I did not have pictures of the mold being built. The slivers of the walnut in the case needed to be small enough to fit down into the mold around the poplar wood shaft that was suspended in the center of the mold. You do not have to use this technique or this wood species. Different woods and different techniques will give the cue a much different look. The technique I am using on this particular cue gives a very random style pattern and is a great technique to use to have a truly one of a kind design. I also used only heart wood and kept that in mind while splitting the wood so i was not doing any unnecessary work. If using this technique make sure to split the pieces into small enough segments to be broken by hand as that will come in handy later on.
Preparing the Mold


The mold for this custom cue is made from 3/4 inch plywood it was designed to suspend a poplar shaft directly into the center of what would become a 1 3/4 inch square blank. The reason for the poplar dowel is two fold. First this will give a solid wood core to install the joint pin and also the weight bolt threads into. Secondly the shaft is designed to help reduce the vibrations felt by the shooter. This will give the cue a crisp feel to the shot making the cue preform better. The ends of the mold were marked with score lines to allow me to know the minimum fill line of the mold. This would ensure that I would have enough material to trim off the excess from the top of the blank and still attain the proper sized. While assembling the mold make sure to line all of the interior surfaces of the mold in packing tape. After lining the interior surfaces use hot glue or silicone to seal all joints including the ends where the dowel is protruding. This makes removing the blank from the mold much easier. Due to the design needed for the mold it was a tad bit oversize to fit into the custom pressure vessel that had to be built for this build. More about the pressure vessel later thought. The corners of the mold need to be removed to allow the mold to fit into the pressure vessel. The most efficient way to do this is to use the band saw. Setting the table at a 45 degree angle and using the fence to support the mold the band saw makes quick work of the plywood. Allowing the mold to fit perfectly into the pressure vessel.
Place the Wood Into the Mold

While this might sound like a straight forward process there is a more to it than just throwing the pieces of wood into the mold. Each piece of wood needs to be properly placed into the mold so that the pieces do not move or float once the epoxy is poured. Also you do not want to force pieces of wood to tightly around the dowel. This could cause the dowel to bend or shift in the mold. Also you want full coverage in the mold the epoxy will fill all of the spaces and voids and this will give you the true random pattern. As you turn the blank down on the lathe it will expose sections of wood and sections of epoxy that were not previously seen. If you are attempting to achieve a specific pattern this is were it will happen. Don’t rush and if you need to try multiple arrangements do so. Once the epoxy is poured there is no going back.
Mix Your Epoxy and Add the Color


Once the mold is properly filled with the wood and you are pleased with the placement it is time to mix the epoxy and add your color. To find the amount of epoxy you multiply the width x the depth x length of the interior of the mold and divide the total by 144. This will give you the board feet capacity of your mold. Simply use a google converter to convert the board feet to liters then liters to ounces. While the wood and dowel will slightly reduce the amount of epoxy you will need from the total of the equation above be mindful not to reduce the amount to much or you will run out mid pour and have to mix more. This can be a issue if you are using custom mixed colors. Be sure to use proper ratios of hardener to resin as well as mix the epoxy thoroughly. Improper ratio and not properly mixing the can both cause the epoxy improperly harden or not harden at all. If this were to happen you would have to start completely over. So its worth the extra time to double check your ratios and mix properly. Simply add the Kp Pigment powders during the mixing process to get the desired color.
The Pour


Pouring the epoxy is a straight forward process but there are a couple of tips that can help during the pour to make it go smoother as well as reduce likelihood of air pockets within the blank. While pouring the epoxy take your time. A slower smooth pour will help to reduce the air that gets can get trapped within the blank. As well as reducing the about of spill out you get from not allowing the epoxy to flow into the cracks and voids within the mold. As you pour the epoxy move from opening to opening and allow the epoxy to flow to the bottom of the mold then refill. This will push the air from the bottom of the mold as it fills reducing the amount that is trapped within the blank. As previously mentioned there are score marks on the inside of the mold to know where to have a minimum fill. This will ensure that there is plenty of material to be able to remove the excess from the top of the blank and still have the proper sized blank.
Apply Pressure


Due to the fact that this mold is a little over 30 inches long it was way to large to fit into a standard pressure tank. To get around this problem building a pressure vessel using 4 inch PVC pipe will work perfectly. Ill make sure to do a post about that process later. Due to the PVC opening being only 4 inches wide the corners were removed earlier in the build. Once the mold is filled with epoxy slide the mold into the pressure vessel and add air pressure to the vessel to the desired level ( around 45 PSI seems to do the trick) . Make sure to not let the vessel roll while attaching the cap as this can cause the epoxy to spill over the edge of the mold into the pressure vessel. Allow the mold to stay under pressure until the epoxy is fully set. This will be a different length of time depending on what type of epoxy and its set time. Check with the manufacturer for detailed set and cure times. Once the epoxy is fully hardened you can remove the mold from the pressure vessel.
Remove the Blank From the Mold


With the epoxy fully hardened it is time to remove the cue blank from the mold. When designing the mold this was kept in mind allowing the ends to be removed with the miter saw and the other sides of the mold using chisels or a screwdriver. This is were lining the inside of the mold with packing tape will come in handy. This allows the sides of the mold to easily come free away from the cue blank.
Trim Excess Material From Top and Cut to Length

Due to the mold design the top of the blank will have excess material. This was accounted for when filling the mold past the minimum fill line. Using a table saw or band saw cut the blank to the appropriate size removing all of the excess epoxy and wood from the top of the blank. Once the excess has been trimmed from the blank determine the finial length of the butt section of the cue and cut the blank to length. A standard pool cue is 58 inches long. So with a 30 inch shaft the but section should be 28 inches long.
Mark Center


Marking the center of the ends of the blank is a very important step. This serves a few different purposes. First this give you the center point of each end of the blank to use for centering the blank onto the lathe. Second but more importantly this is the points at witch you will be installing the joint pin and the weight bolt on either end. To mark the center hold the blank with a vice or clamp so that the end of the blank is facing up. Place a ruler or straight edge running from one corner to the opposite corner. With a pencil mark a line along the ruler. Move the ruler to the two remaining corners and repeat the process. Where the two lines meet is your center point. This is a simple process but is made much more accurate when using a properly cut blank. Make sure to do this process before removing the corners of the mold.
Cutting Corners


Now that you have marked the center point of your blank you can remove the corner down the length of the blank. If you have not marked your center point go back to step 9 and do so before removing the edges of the blank. This process is identical to the process of removing the corners from the mold earlier in the build. Set you band saw table at a 45 degree angle and use the fence or a straight edge to guide and support the blank. Repeat this on all four corners. This is done for one main reason. Turning a square epoxy blank on a lathe almost always causes chipping or can even cause the epoxy to shatter. Removing the edges roughly rounds the corners of of the blank off making the initial turning much smoother and go much faster and the cuts much cleaner.
Rough Shaping


Using the center marks made previously mount the blank onto the lathe using a spur driveand live center. Its now time to start rough shaping of the blank. Before doing so make sure your lathe chisels are as sharp as possible. This will make the cuts much cleaner and reduce the amount of chipping. Any time the chisel starts to feel dull stop to resharpen.Take you time shaping the blank. Do not try cut any one single section of the cue to its final dimensions at a time. Instead move the tool rest back and forth down the length of the cue making slight cuts and trying to keep the blank as uniform as possible. At this point you are trying to get the blank to a uniform size from one end to the other of the cue. Once you are close to this point use a flat sanding block and 80 grit sandpaper to rough sand the blank. Constantly move the sanding block around on the blank you will start to see that the low spot are highlighted by this process. Keeping the sanding block as level as you can and continue sanding. You will start to see the untouched low areas start to vanish. DO NOT hold the sanding block in one spot for any length of time. This process when done correctly will help to get a smooth shape to cue blank as well as to help remove any chipping in the epoxy from cutting with the chisels. Continue this process until you have a smooth uniform cylindrical shape to the blank.
Installing the Joint Cap


3 More Images
Now the the cue blank is at its rough shape you can mount the 4 jaw lathe chuck and it is time to install the joint cap. The joint cap is a plastic or metal cap added at the joint to add strength and rigidity to the joint of the cue. While there a few different designs that you can order I went with a simple joint cap design that is installed onto a tenon and epoxied into place. The first step to installing the joint cap is to measure the length of the joint cap and mark that length on the cue. This is the mark that will indicate where to stop cutting on the blank so that the cap fits flush against the end of the cue blank. Next set a caliper to the widest diameter of the inside of the joint cap. This will be your guide to how much material to remove. Work slowly from the end of the cue to the mark made previously on the blank removing small amounts of material at a time and checking often until the calipers will fit tightly over the remaining tenon. Once you have reached this point test fit the joint collar. If the collar does not fit remove extremely small amounts of material and test fit again. Repeat this process until the joint cap fits snugly all the way down to the line marked previously on the cue. The joint cap should have little to no movement on the tenon. Now that the joint cap is properly fit mix up a small amount of epoxy and apply it onto the tenon and into the opening on the joint cap. When installing the cap onto the tenon for the final time slightly rotate the cap onto the tenon ensuring proper coverage of the epoxy. Allow the epoxy to fully harden before moving onto the next step.
Installing the Joint Pin


This is by far the most important part of the cue to correctly install. If the joint pin is mis-aligned it will cause all kinds of problems. Causing the cue to preform poorly or even seem warped. Using a self centering pin helps with this but take your time through this process and make sure to get it right. A Steady Rest is required for this process. With the cue still aligned on the live center adjust the steady rest to securely hold the end of the cue to line up the center point marked on the cue earlier perfectly inline with the center tip of the first bit. If if does not perfectly line up readjust the steady rest to get the proper alignment. There are different size joint pins and threads but this process should be the same for all of them but will require you use the proper size bits at each stage and the proper thread tap. This step up drilling method starts with using a self centering counter sink bit in a tail stock drill chuck. From there move up in small increments until at the final size drill bit needed to properly fit the thread tap needed for your joint pin. When threading the joint pin rotate the cue by hand, working the tap into the cue slightly before backing the tap out to break the chips. Once the final tap depth is reached remove the tap and clean out the threads using compressed air. Insert the joint pin into the drill chuck to the desired depth you want protruding from the butt of the cue. Remember its better to make the visible part of the joint pin a one to one and a half threads shorter that the maximum it will enter the shaft. This will ensure the shaft will tighten down securely at the joint and not bottom out. To test fit thread the joint pin into the cue until you reach the drill chuck. If the joint pin properly fits its time to install the pin. Do this by leaving the pin mounted in the drill chuck and applying epoxy to the portion of the pin that will be threaded into the butt of the cue. Once the epoxy is applied slowly thread the joint pin into place and allow it to fully harden before removing it from the drill chuck.
Install Butt Cap


Flip the cue over with the butt end of the cue towards the tail-stock. It is now time to install the butt cap. This process is identical to installing the joint cap. Mark the length of the butt cap onto the cue then using calipers set the the interior diameter of the hole in the butt cap. Slowly remove material checking your progress often until the butt cap fits tightly onto the tenon with no movement. Once the butt cap is properly fit apply epoxy to the tenon and inside the butt cap and install the butt cap onto the tenon slightly rotating the cap to properly spread the epoxy. Once the cap is in place apply light pressure using a small socket and the tail stock and allow the epoxy to fully harden before removing.
Final Shaping


Now that all of your caps are in place you can start final shaping of the cue. Start with the joint end of the cue. Using calipers find the diameter of the joint end of your cue shaft. Using that as a guide slowly remove material on the joint end of the cue until the end of the joint cap is only slightly larger than the shaft. DO NOT cut the joint section flush with the size of the shaft. After final sanding and finishing this would cause the final diameter of the joint end of the cue butt section to be smaller than joint end of the shaft leaving a lip. Once you have reached your rough size at the joint take your time slowly removing material on the cue until you have reached the proper shape. Most playing cues have a conical taper to the butt section. This means that from the joint end of the butt of the cue to the opposite end is one smooth taper from small to large. Like previously when you are close to the shape you would like to have use a flat sanding block and 80 grit sand paper to smooth out the taper and any variations in the cue. Use a straight edge to check for small high or low areas in the cue and remove them until you have a smooth taper from one end to the other.
Weight Treads and Bumper Install


Now its time to install the weight bolt threads and the bumper. This is done in a similar process to installing the joint pin. With the bottom end of the cue mounted on the steady rest. Align the center mark on the cue perfectly to the tip of the first bit. Like with the joint pin start with a self centering counter sink bit. Stepping each following bit up in size until you reach the appropriate size for the thread tap needed. Also like with the joint pin there are many different style and designs of weight bolts each using different size, depth and threads. The bumper is the same idea in that there are many different ways the bumper can mount on. I chose to use the press in style. This style is held in by friction of a tenon made onto the bumper being pressed into a hole in the end of the cue. For this particular bumper it uses a tenon slightly larger than 3/4 of an inch. To achieve the proper fit. Start with a 3/4 inch forstner bit. Drill the depth only slightly deeper than the length of the tenon on the bumper. Once the hole is properly drilled use sand paper to remove tiny amounts of material at a time until the bumper fit tightly into the hole. The bumper should fit extremely tight as you do not apply any adhesive to this style bumper and the tight fit will ensure the bumper will stay in place and not fall out during use.
Dial in the Weight


Pool cues come in many different weights. Depending on the desired weight you can use weight bolts to dial in the weight properly. To dial in the weight get the weight of the butt section and add the wight of the shaft together. From there figure out the difference in the desired weight. From there you can add weight using the appropriate weight bolts or even remove weight from the cue by placing it back on the lathe and removing material until your have reached the desired weight. Do not remove weight from just one section of the cue as it will cause problems with the taper of the cue. Using sand paper remove material along the length of the cue checking the wight often until you have reached the desired weight. Do not remove to much as you will be sanding more during the finishing process.
Finishing


You are now on the home stretch. Time to do final sanding and finishing. Start by using a flat sanding block and sand down the end of the joint section of the cue until it perfectly matches the diameter of the joint end of the shaft. Make sure to preserve the taper as you do this. Once the joint is perfectly sized start finish sanding using either sandpaper sheets or a flat sanding block moving up in grit until you reach around 600 – 800 grit. At this point it is time to add the finish. For this cue I decided to do a multiple layer CA glue finish. Applying CA glue and then sand starting at 600 then 800 then 1500 for three layers repeating the sanding process. On the final layer start with 1500 sanding progressively up to 12000 grit micro mesh. This gives the cue a deep finished look. For the final step use EEE- Shine tuners polish to polish the finish to a high gloss finish. Apply the wax with the lathe off and spread evenly. Turn on the lathe to a medium high speed and apply light pressure until the haze of the wax is spread evenly. Turn up the speed of the lathe slightly and apply a little more pressure. The heat from the pressure will form a very high gloss shine. Be careful not to apply to much pressure or to stop moving the cloth this can cause you to burn the finish and you will have to start the finishing process again.
Go Play Some Pool and Enjoy


This process is a ton of work and it takes a good bit of time but it is such a fun and rewarding build. I have to say there is nothing better than winning a game of pool with a cue that you yourself made. Take your time and plan out this build if you are planning on attempting it. This build has to be done properly and there are more than one step that if you get wrong it could cause you to have to start back over. When it is completed correctly though it is so satisfying. Thank you for making it this far and i hope this helps you build your own cue and makes the process less painful. If you have any questions hit me up in the comments. Also let me know what you think of the cue. The video at the beginning of this Instructable is on Youtube make sure to subscribe and free free to share. If you want to show your support Click Here or you can head over to my Etsy Store. Thank you and I will see you guys on the next one.
If you would like to win a custom pool cue or custom pen. Click the link below to enter into the Custom Cue raffle. First place prize will be a Custom Pool Cue , Second place prize is a Custom Vertex Pen and third place is Custom Slimline pen. Only 250 spots available and winners will be drawn and announced live on my Instagram and also posted to facebook and youtube. ENTER HERE:
https://jpaynewoodworking.com/product/raffle-win-a-custom-pool-cue/