 JPayne Woodworking Creative Craftsmanship
Recently, I decided I wanted to try to build a lathe cart for my shop but I wanted to challenge myself to do this in a bit of a different fashion than what I normally do my builds. For me the first step of a project is usually to get on the computer and start by sketching up a 3D model of whatever project I would be making. This serves a few different purposes. One is to ensure that during the building process all of my measurements and I can also be confident that the entire project will come together with no issues when jointing or assembling the project. For this particular build though things were a bit different, I have been extremely busy and did not have a lot of time to spare for any shop project builds. With this in mind I set out to build a sturdy mobile lathe cart that would house my lathe as well as most of my other turning accessories and tools. I also wanted to challenge myself to see if I could build this project start to finish in 2 hours or less. I also did not want to break the bank so I used some scrap supplies that I had laying around the shop. Longer pieces of three-quarter inch plywood as well as spare two by fours and 4 x 4 posts. I also grabbed four casters from the local Lowe’s just to make the cart mobile.

I started off by ripping down the one of the larger sheets of 3/4 inch plywood on the table saw. This would eventually become the bed and also the wait for the top platform of the cart. For this essentially I had taken measurements of my lathe to ensure that there would be sufficient room on the bed of the cart for the lathe and most of my project will fit my lathe. as well as clear the backing plate allowing me to install a dust collection port into the backing plate to help with cleanup. If you’re planning on making a project like this take into consideration also things like if you will be doing any wider turning projects as the backer plate will have to be further away from your lathe to clear them.

Though I have recently moved into a bit of a larger shop from my previous working area. This shop is still not a massive shop.being only 12 ft wide and 28 ft long on the interior it is essential that all of my tools and carts mobile if at all possible. With that in mind I wanted to mention that I use a contractor saw from Metabo. This is their 10-inch contractor saw and this is a gigantic space-saving tool in shop. I do often leave the table saw setup to be able to make quick precise cuts it also is very easy to break it down and stow away against a wall out-of-the-way allowing me to have full access to the width of my shop. I thought this is a point that I should mention as I know most of you work in smaller areas or shops and I have been very impressed with the saw and how easy it is to set up and also break down and put away. Just some food for thought.
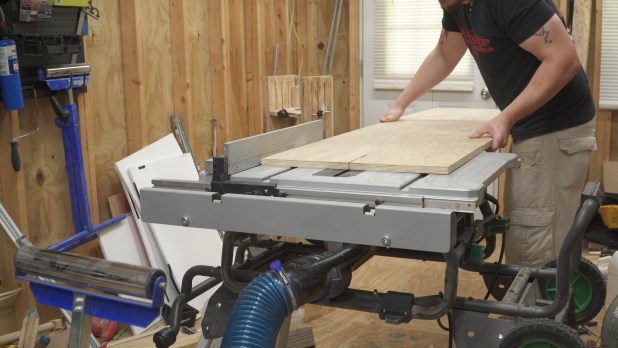


Also with that being said make sure to make all of your cuts while they saw is set up. I have made this mistake after deciding I would be adding a small shelf to the bottom of the how to get the table saw back out. this is not so much a mistake but is a consequence of trying to build such a project without a set of plans amd making changes on the fly. With all of my plywood pieces ripped to width I used the DeWalt track saw to cut the pieces to length. I do have to admit that I had never had the chance to take full advantage of a track saw setup. But after using this saw on a couple of different projects I am completely won over. Being able to lay a track down and make very precise quick cuts on larger pieces can a project go by much much quicker. This has quickly become one of my favorite tools and I will be doing a review on this tool later on. For now I use it an very large amount, also this is another tool that you get a very large bang for your buck as far as space in your shop. It is extremely versatile an makes up very little room in the shop.


Next was to cut the smaller pieces of plywood to length as well as the frame for the platform of the cart. One thing you may be asking is why I am using my miter saw in the video in the floor of the shop while there is also a miter saw all in work table during assembly. The answer to this is pretty simple I had not yet had a chance to remove the old miter saw and put in place the DeWalt. So for this project I was using this all on the floor as it is capable of making single pass cuts through the four by fours I would be using later on in the project.


After the pieces for the platform had been cut to dimension. I started with assembly. I started by assembling what would be the platform frame two-by-fours. Securing them with two and a half inch wood screws. I then attached the bed of the platform to the frame using 2 inch wood screws and aligning the bed of the platform so I would be to mount the backing plate or back wall of the platform and screw it firmly into place on the platform.


Before attaching the backplate I wanted to add in a dust collection Port. This would serve a couple of different purposes this would make cleanup of the platform much easier and also would allow for some form of dust collection during turning to aid in suppressing the dust and shavings produced while turning on the lathe. The thought would also be that the backboard of the platform would help to catch and reduce chips and dust going behind the Lathe. I attached this dust port hood buy first marking off the outer edge of the port bezel. then measuring out offset to allow for the bezel to sit flush against the inside of the backboard. After all the measurements had been laid out on the backboard I use a jigsaw to cut out the square port then mounted the dust port hood using 2 inch screws and small strips of plywood as a clamping system to hold the hood in place.


I then mounted the backboard of the platform securely into place making sure that it was square with the bed of the cart. then test fit my lathe to ensure that delayed would fit properly with plenty of room.


With the platform of the cart complete I moved on to building the legs and base of the cart. I was using four lengths of 4 x 4 post for the legs. Once they were cut to the proper dimensions they were secured to the cart using multiple 3 inch screws into each post. After attaching the legs I moved on to the base that would be made using two by fours and also for small feet pads to allow the attachment of the casters.


One thing to note is that I did take proper steps to ensure that the base was properly aligned with the legs directly Center of the width of the base. This would give him the most stability and strength. Once the base assembly was complete I attached the four casters to the feet pads on the base of the cart.


After flipping the cart up onto its casters I then attached the lower Shelf that would add extra storage to the cartis mounted in place on the base of the cart. I also then securely mounted the lathe to the bed of the cart ensuring that it could not move. The final step was to test the casters and locking ability to make sure that the cart would not be able to move around while turning. This test went fantastic as these casters lock extremely tightly and hold the cart securely into place. I then added my previously made accessory shelf to the back of the cart as well as a few other small things to allow for easy access to some of the other lathe turning accessories such asa face mask, respirator, and apron.


The cart is now complete and ready to use. like I previously mentioned that with no true playing previously laid out. it was a bit of a challenge as I had to do a lot of problem solving on the Fly to be able to complete the task in under 2 hours. With that being said the sturdy and should last a very long time. Another great thing is that if I am ever able to upgrade to a larger ladies which one day I hope I will be able to and then repurpose this cart as it has many different purposes that it can be used for in the shop. Another added benefit is that the cart now allows for storage of things like the router plane jig for the lady Eve as well as the router used with the Jig. These things were taking up for space in the shop and like any space being able to store things vertically instead of just on the floor really freeze up space in the shop. The making of this card change the layout of my shop more than I even expected heading for the possibility of the use space in my shop much more efficiently. I really am happy with how it came out and if you guys would possibly be interested in some easy plans to be able to build something similar to this in just a couple hours at your own shop please leave a comment in the YouTube video and I can get some plans made up an available for you guys here on the website.
So I hope you guys have enjoyed this to our build this might become something I try to do as a routine series to figure out easy fast builds that make an impact on your shop and can be completed in just a couple of hours or less. Let me know what you guys think. also make sure to subscribe on YouTube as well as follow me on Instagram for more pictures and videos. I hope you guys have enjoyed it and I will see you on the next one. Also make sure to sign up for the newsletter to keep up with new posts, videos and more!
